Jobs
On the jobs page the user can find information about their jobs and schedule new ones. The page is divided into three sections:
Queue & Job history
Quick Deploy
Add job to queue
Queue & Job history

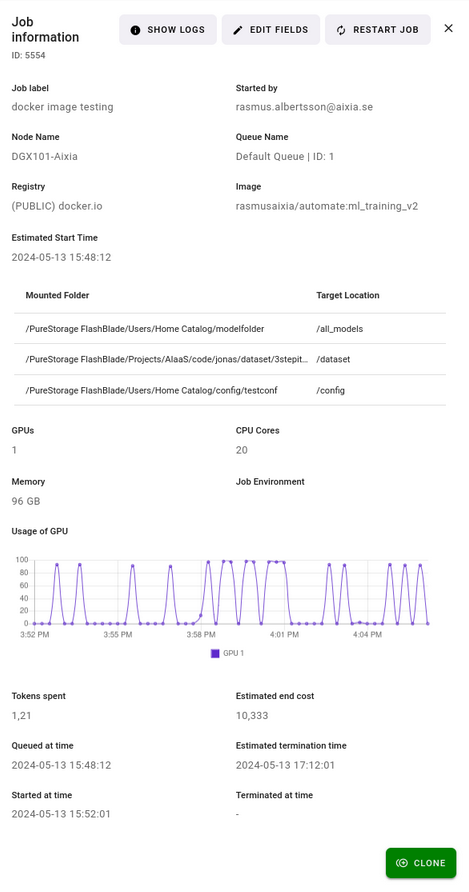
Here, you can view all jobs in the following order: running jobs, scheduled jobs, and completed jobs. You can filter jobs by status using the drop-down menu or search specific fields with the “Filter” text field. The table displays common parameters, along with the remaining time for running jobs and the hardware utilization percentage. To see more details about a specific job, click on its row in the table. This will open a popup showing:

ID: Job ID.
Show logs: Show the logs from the job container.
Job label: Name of the job.
Project: Name of the project used to schedule the job.
Started by: User who started the job.
Node Name: Name of the node the job was scheduled to or is running on.
Queue Name: Name of the queue the job was scheduled to.
Registry: Which Docker registry the job image belongs to.
Image: Which image the job uses.
Command: If and what command was used when starting the job(N/A if no command was specified).
Open proxies: Table with links to the open ports in the job container. Open ports can be either private, public or closed (for more information check exposing ports). The state of the port can be changed by clicking the three dots to the right in a row.
Mounted Folder: Which folder are mounted to the job.
Mounted Folders location: The main folder of the location.
GPU’s: Number of GPU’s that the job uses/used/will use.
CPU’s: Number of CPU cores that the job uses/used/will use.
RAM: Amount of RAM memory that the job uses/used/will use.
Job Enviroment: If chosen, the enviroment will pop up here.
Estimated start time: When the job is scheduled to run.
Usage of GPU: Graph showing GPU utilization for the GPUs the job has run or is running on.
Usage of CPU: Graph showing CPU utilization for the CPUs the job has run or is running on.
Tokens spent: Number of tokens that the job has cost so far.
Queued at time: When the job was added to queue.
Started at time: When the job was started.
Estimated termination time: The expected time that the job will finish.
Terminated at time: When the job stopped running.
Estimated end cost: Cost if the job runs until the estimated termination time (Applies only to running jobs).
Estimated end cost: Total cost of job after it has finished (Applies only to finished jobs).
Note that some of the fields might not be shown depending on the parameters of the job.
At the bottom of the pop-up you will find a button to “Clone” the job. This will close the pop-up and insert the information in to the corresponding fields in the queue jobs panel. To run the cloned job you have to press “Queue job”.

Logs
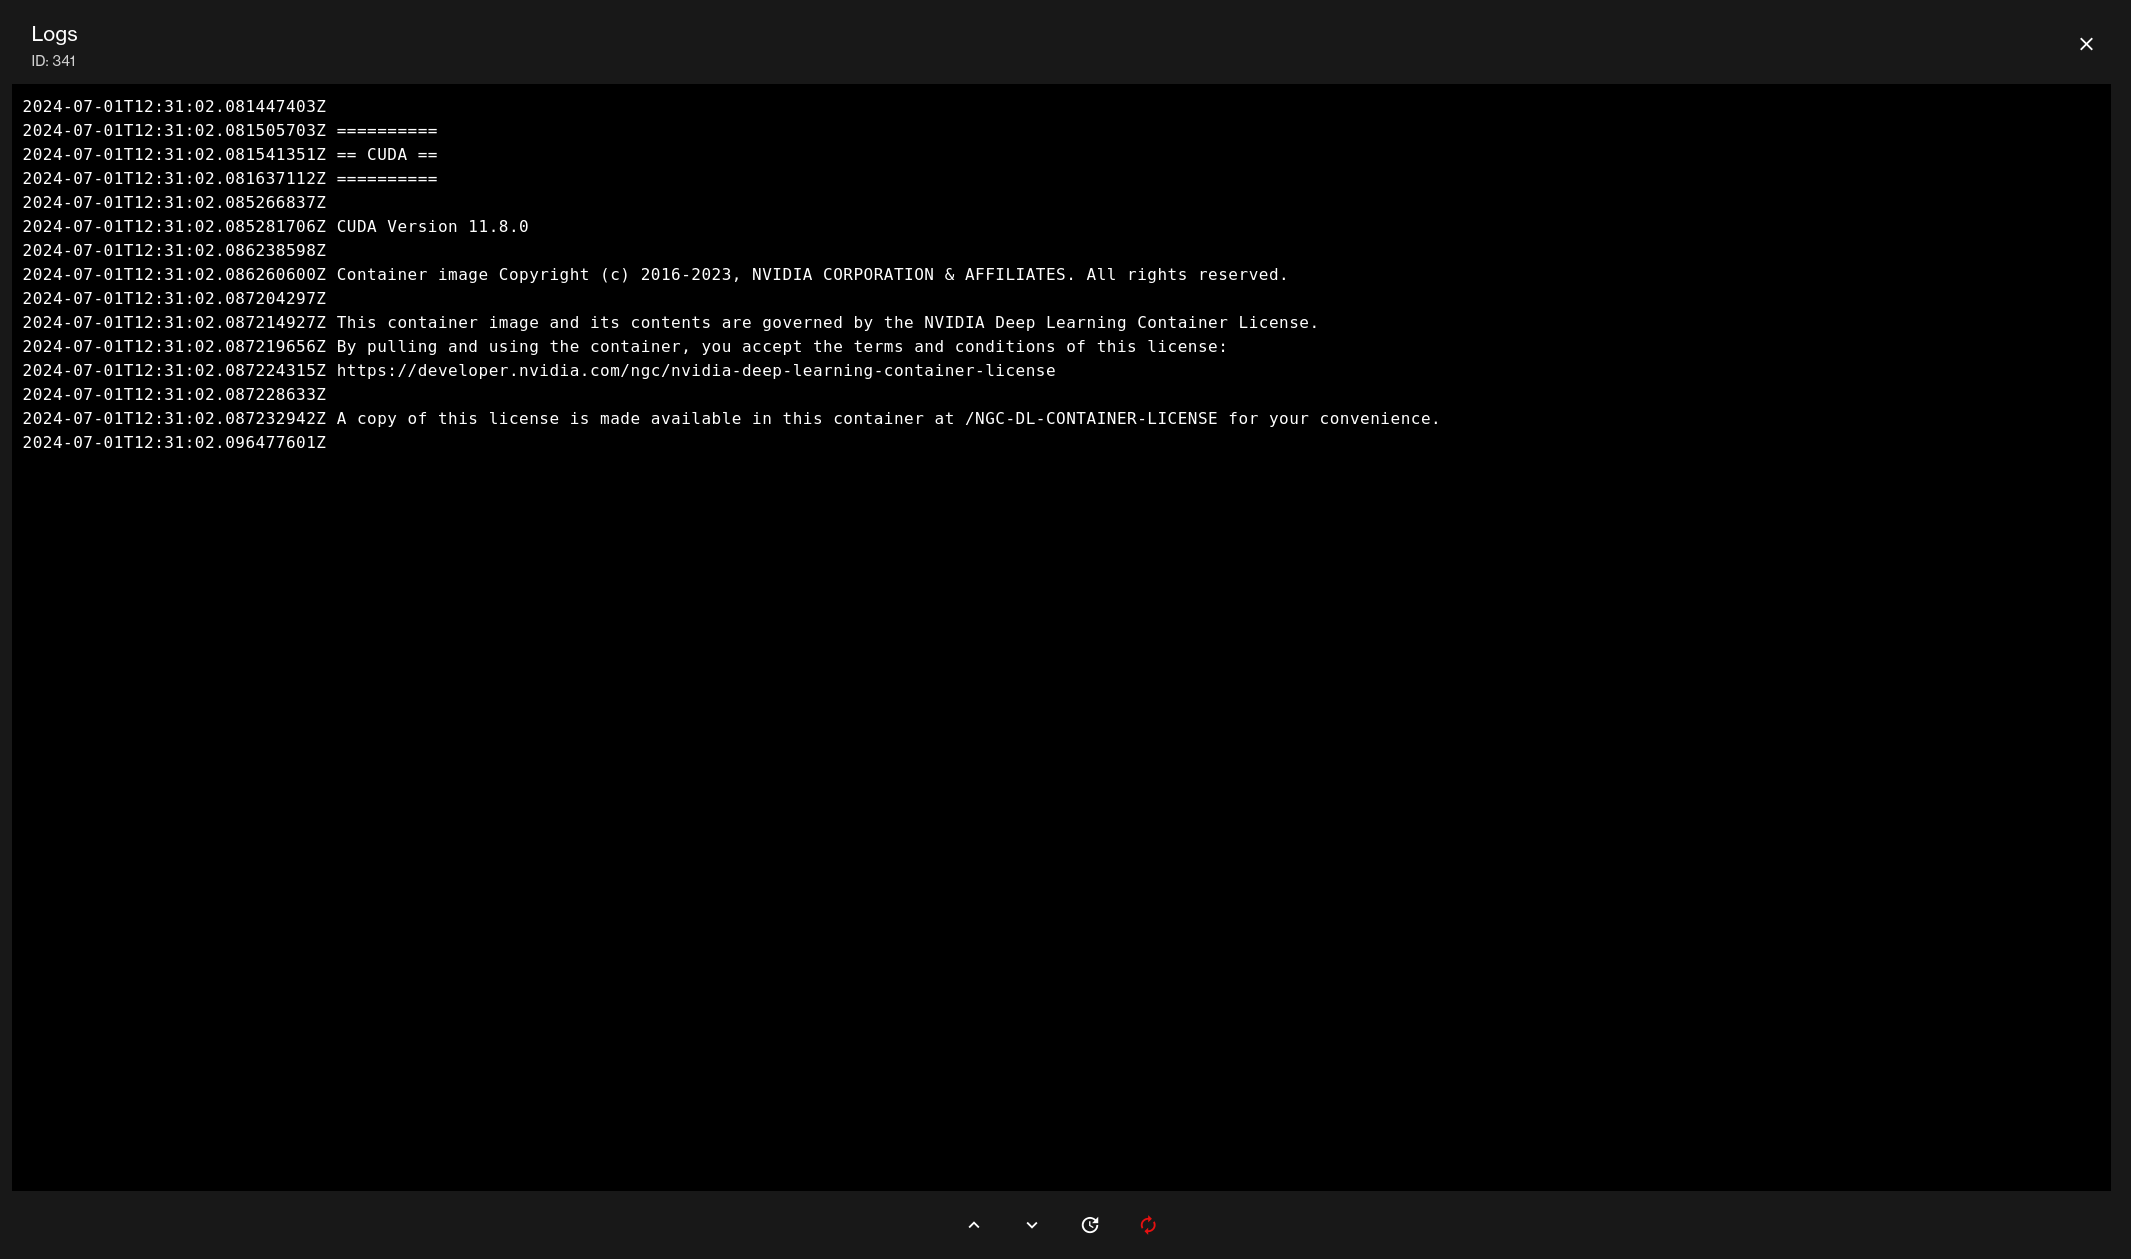
In the job details popup, accessible by clicking on a job in the table, there is a “Show Logs” button. Clicking this button displays the logs generated by the job.
This is particularly useful when running a job that operates automatically without direct interaction. The logs allow you to monitor its progress and activity.

The buttons in the logs are as follows from left to right:
Go to top - Takes you to the top of the logs
Go to bottom - Takes you to the bottom of the logs
Refresh - Refreshes the logs
Auto Refresh - Auto refreshes the logs
Terminal
When a job is running the user can connect directly to the container with the help of the terminal. To open a terminal press the 3 dots in the “Actions” column of a running job and choose “Terminal” in the drop-down, or press the terminal icon to the left of the 3 dots. This will open a terminal session with a bash shell (or sh if bash is unavailable). The user can then have multiple terminals, connected to different jobs, opened at the same time. To close the terminal session press the X-symbol on the terminal tab (NOTE: The session can not be retrieved after closing, if the user presses “Terminal” in the drop-down again it will be a new session). If the user want to leave the session open so they can come back to it they can just minimize the terminal window. It is recommended to use Screen or tmux if you need to reconnect to the same session and/or need a long-running terminal script.

Extra tip! Keep a job alive after completion
To ensure a job continues running indefinitely or until its endtime, use a long-running command or process within it. A common method is to employ the sleep command with no duration:
…/init.sh
#!/bin/bash

# Run your commands, ex
python your_script.py

# Keep container alive with sleep infinity
sleep infinity
Note: Unless manually stopped, the job will remain active until terminated. For non-interactive jobs, this means indefinite running. For interactive jobs, it will stop when it’s endtime is reached.
Quick deploy container
We offer a selection of Docker images for rapid deployment. Please select from the available options to suit your needs. This section is regularly updated to ensure the versions are accessible. For a clearer understanding and to facilitate your selection process, detailed descriptions are provided for each image.

There are a few quick deploy tutorials available on the Quick deploy tutorials page.
Add job to queue
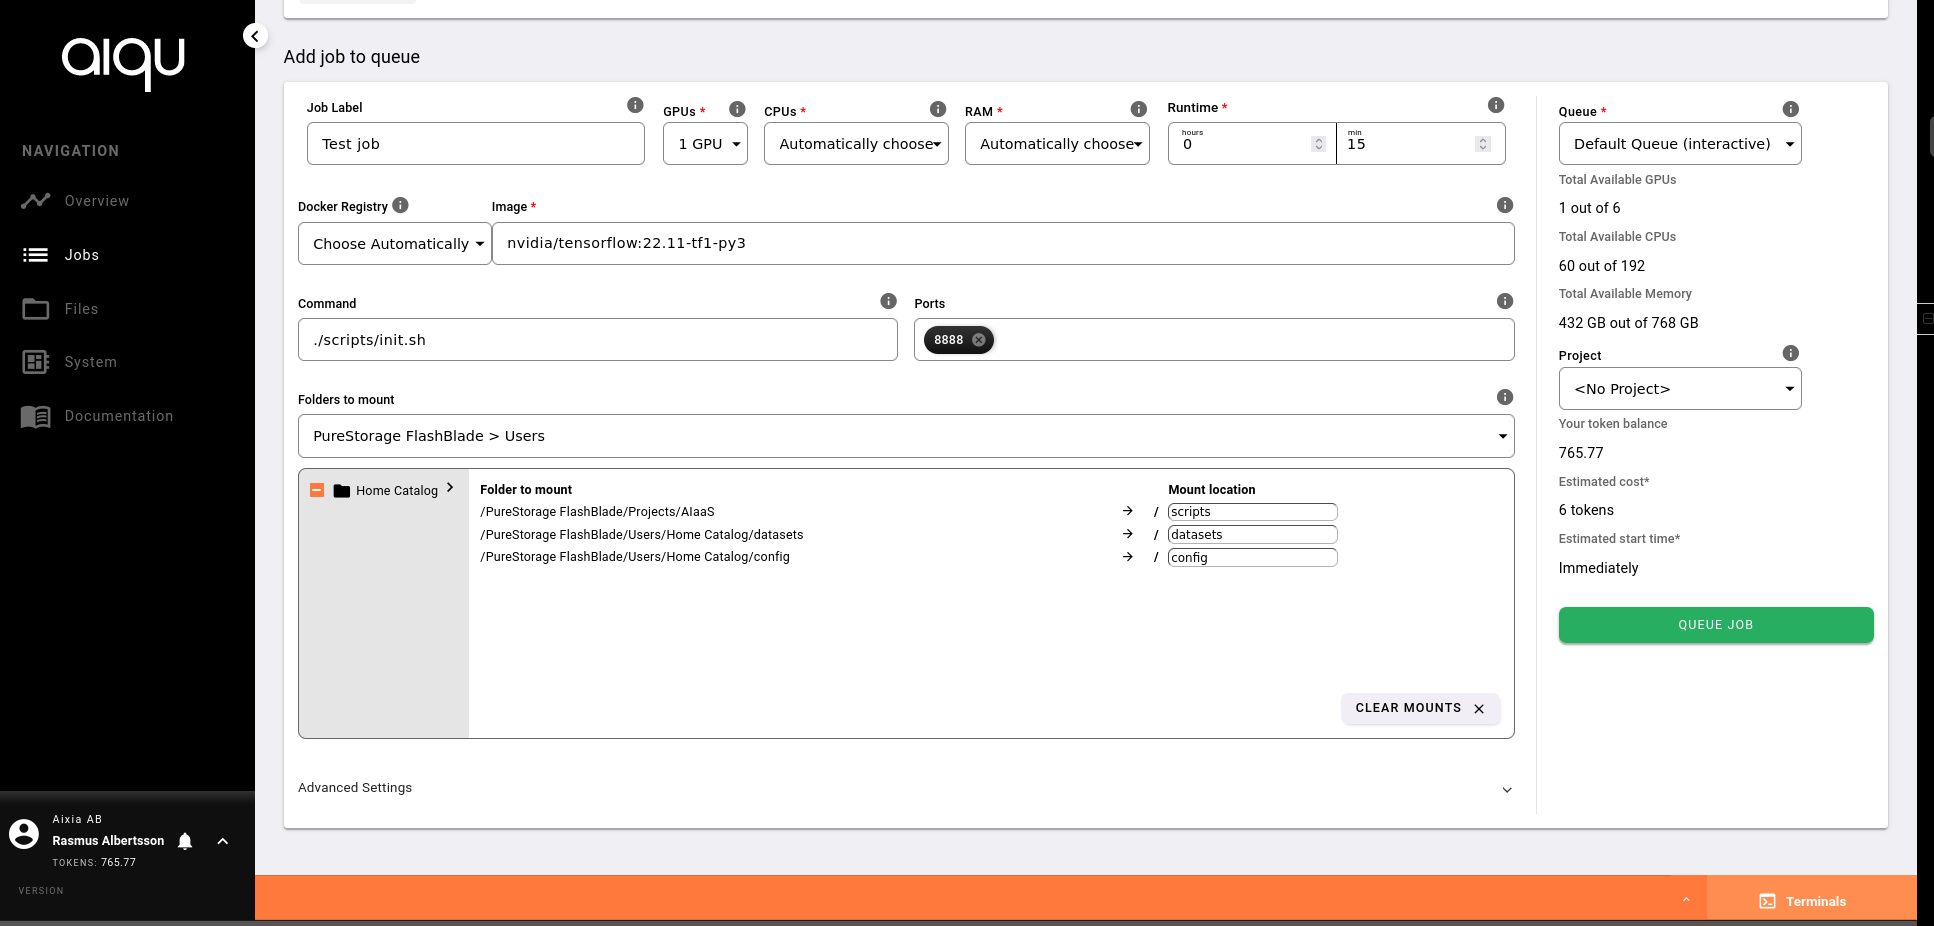
This panel is where the magic happens: The queueing of jobs. To queue a job you will have to fill in a number of fields and have available Tokens that are consumed when the job is running. The job will run as a Docker container on a node(s) from the queue that the job is queued to. The number of available GPU:s from the nodes in the queue is displayed to the right. If enough nodes are available in the queue the selected image will be downloaded, if it hasn’t been already, and the job will start. Otherwise the job will be scheduled for later (the estimated start time can be found in the panel on the right).

Parameters
As mentioned before: there are a couple of fields that you need to specify to run a job:
Job label: Name of the job.
GPU: Number of GPU’s that the job will use. The number of GPU’s available for you is specified by the admin.
CPU: Number of CPU’s that the job will use. The number of CPU’s available for you is specified by the admin.
RAM: Amount of RAM that the job will use. The amount of RAM available for you is specified by the admin.
Runtime: How many hours and minutes the job will run for. NOTE: Runtime is not required for non-interactive jobs.
Docker Registry: Choose which registry the job image belongs to. The registries available can be specified by the admin, default are NGC and Docker Hub. If you leave it at “Choose Automatically” it will prioritize by order, which also can be specified by the admin. By default NGC is checked first and if no matching image is found there docker hub is checked. Additionally admin can grant usergroups permission to add and edit their own registries, this can be done in “Your registry settings” in user settings.
Image: Which image the job uses. You can also choose a premade base or a image you used previously.
Command (optional): The command that will be run when the container starts. This can for example be used to start a script at the beginning of the job. NOTE: Is required for non-interactive jobs.
Ports (optional): Ports to be exposed in the container, seperated by commas if you want to expose more than one. This will map the ports to an url that is accessible after the job has started. A common use case for this is to setup an SSH-server in the container and expose the port to allow an you to SSH directly into the container. For more information check exposing ports
Queue: The queue used to schedule the job. By default the user’s default queue is selected.
Project (optional): If a project is selected the cost of the job will be drawn from the projects tokens instead of your personal tokens.
Folders to mount (optional):Here you can specify which (if any) folders should be available in the job container. The available files can be viewed on the Files-tab. Specify which folders you want to mount and where you want to mount them. For example if you mount a folder named /MyData to /data_to_use, the contens of /MyData will be available in the jobs container in /data_to_use.
On the right panel you can see how many GPU’s/CPU’s and RAM are available for you to schedule to, how many tokens you have and the estimated cost of a job with the specified parameters. Press the “Queue Job”-button to add the job to the queue and the job will appear in the table on the top of the page.